Aveek
Software Engineer Information TechnologyPart 1 : Android Constraint Layout
Malaysia 01 August 2018

Good day everyone, we who develop application on Android platform, have already heard of the newly introduced layout provided by Google; Constraint Layout. Among my friends, I have heard many still did not try this layout due to some confusion and different way of implementation than mainstream ones. Few days back, I was also in that stage and could not get enough motivation to fire start. Thanks to my mentor, who really wanted me try this and I have brought myself to that level where I am confident enough to start designing layout with Constraint Layout.
I am not going to teach you what to do, instead I will share my story how I have learned and at the same time I will show few sample designs to clear the confusion.
Before going to start, let me tell you one thing; No matter how many resource you find out in the web, in the end, you need to make your hands dirty. Meaning, you need to try by yourself to become a master at anything.
Lets dive into our topic…
When we try something new, we always find out few new terms. Constraint Layout have also some new terms we will see/hear while having the journey to learn. I am trying to note down few of the terms that are really important for learning Constraint Layout.
- Constraint
- Flat View
I will go through each of the major terms briefly to clear the confusions. However, my focus is to teach how to learn rather than going through the theory.
Constraint : A constraint is something which helps to join one view with another. In Android, we connect two views with constraint. You can consider this as a string for connection.
Flat View : As a developer, you must have heard of Linear Layout, Relative Layout etc. In those views, if you notice carefully, you can see we have view hierarchy to maintain to achieve the required behaviour. In Constraint Layout we do not have any view hierarchy; To be precise, NO NESTED LAYOUT.
The below properties are really important to understand how to implement the constraint layout.
- constraintTop_toBottomOf
- constraintBottom_toTopOf
- constraintTop_toTopOf
- constraintBottom_toBottomOf
- constraintLeft_toTopOf
- constraintLeft_toBottomOf
- constraintLeft_toLeftOf
- constraintLeft_toRightOf
- constraintRight_toTopOf
- constraintRight_toBottomOf
- constraintRight_toLeftOf
- constraintRight_toRightOf
- Guideline
- Barrier
- Parent
These are the major keys to design any layout using Constraint Layout. As I told earlier, you need to make your hands dirty by playing with Constraint Layout to gain the confidence. The below images (image 1 to image 8) are just added to make you understand what are the fields/keys required and how to use them in a Constraint Layout.
To design one layout, you must have already drawn inside your mind or somewhere how the layout should look like. For Example, You have 2 TextViews and 2 Buttons in a layout (TV1, TV2, BTN1,BTN2). You need to place them as
BTN 1 below the TV 1,
TV 1 above the BTN 2,
Top of TV2 aligned with the top of BTN2,
Bottom of TV2 aligned with the bottom of BTN1
Note : Please see below images just to understand the above requirement. Since we are only placing each of the views respectively, we did not add necessary layout params to make it all aligned and beautiful. In the next chapter, we will see a practical example which will help us to connect the dots in order to make a presentable layout.
constraintTop_toBottomOf :
Self explanatory. Lets consider two views; for instance TV1 and BTN1. I would like to place the BTN1 below the TV1. I will place constraintTop_toBottomOf in BTN1 as :
app:layout_constraintTop_toBottomOf=“@id/TV1”

image 1 : Top To Bottom ~ Design Layout
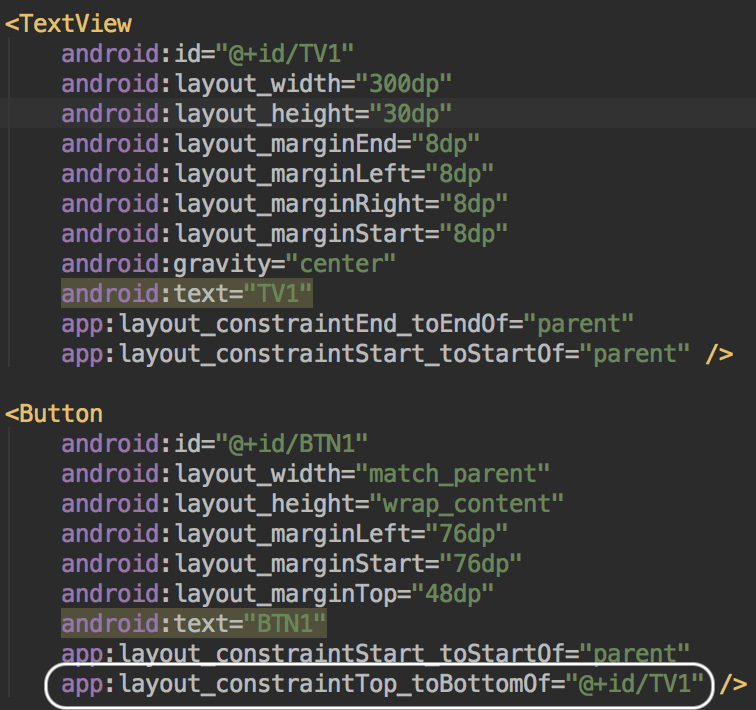
image 2 : Top To Bottom ~ XML
constraintBottom_toTopOf :
Self explanatory. Lets consider two views; for instance TV1 and BTN2. I would like to place the TV1 above the BTN2. I will place constraintBottom_toTopOf in TV1 as :
app:layout_constraintBottom_toTopOf=“@id/BTN2”

image 3 : Bottom To Top ~ Design Layout

image 4 : Bottom To Top ~ XML
constraintTop_toTopOf:
Self explanatory. Lets consider two views; for instance TV2 and BTN2. I would like to place the top of TV2 aligned on the top of BTN2. I will place constraintTop_toTopOf in TV2 (or vice versa) as :
app:layout_constraintTop_toTopOf=“@id/BTN2”

image 5: Top To Top ~ Design Layout

image 5: Top To Top ~ XML
constraintBottom_toBottomOf:
Self explanatory. Lets consider two views; for instance TV2 and BTN1. I would like to place the bottom of TV2 aligned with the bottom of BTN1. I will place ConstraintBottom_toBottomOf in BTN1 (or vice versa) as :
app:layout_constraintBottom_toBottomOf=“@id/TV2”

image 7 : Bottom To Bottom ~ Design Layout
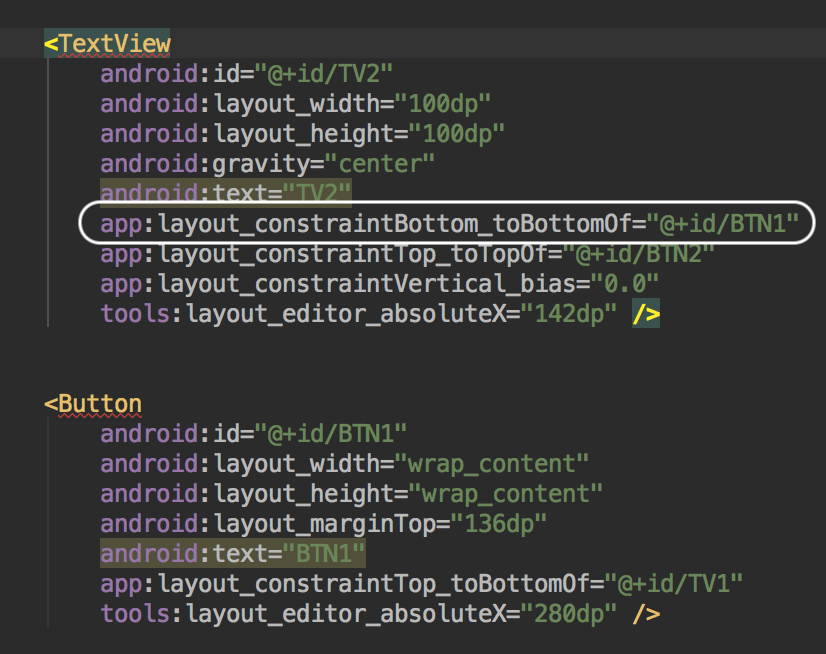
image 8: Bottom To Bottom ~ XML
I believe you have understood how it works. Similarly, please try
constraintLeft_toTopOf
constraintLeft_toBottomOf
constraintLeft_toLeftOf
constraintLeft_toRightOf
constraintRight_toTopOf
constraintRight_toBottomOf
constraintRight_toLeftOf
constraintRight_toRightOf
Guideline : This is a bit advanced topic which is very helpful to design layout with a exact positioning. For instance, lets say you have 3 buttons (BTN1, BTN2, BTN3); You want to give each of the buttons exact same space in a screen and align them horizontally. We can easily achieve the requirement by setting guideline. We will set two guidelines (GL1, GL2) , each will be set at 33% and 66% position respectively on the screen. Then, we will place our BTN1 on the left of the screen and attach the right of BTN1 on the left of GL1. Similarly left of BTN2 on the right of GL1 and right of BTN2 on the left of GL2. The third button BTN3 will be placed in between GL2 and the right most edge of the screen.
To add, we can achieve the same behaviour without guideline. Do not just think this is the only way to achieve this requirement.
Barrier : I consider this as an advanced topic as well. Let me explain with an example. Consider two views, View1 and View2. View 1 is designed in such way that it is movable, when View1 will move we want View 2 to move as well. In this case, we will set a barrier (BR1) with View1 and attach the View2 with BR1. This is mostly useful when you have a group of views dependent on one specific view. We can set a barrier of that specific view and attach all other views to it.
Parent : This represents the entire layout. When we need to set any view on the top/right/bottom/left to the screen, we need to set the view with the parent. We will see the example which will help us to understand the term.
In the next chapter (Part 2), we will see a practical example. I am pretty sure, by completing the next chapter, you can design your own views with Constraint Layout.
~ Happy Exploring !!