Aveek
Software Engineer Information TechnologyPart 2 : Android Constraint Layout (Design Layout Using Constraints Only)
Malaysia 01 August 2018
Hello folks, welcome again! Thank you for being here. After the first part, as I promised, I am going to share the hands on experience on Constraint Layout. Today, I am going to show you how to design a layout with Constraint Layout. I have chosen a sample from the web and I am going to design that layout. I believe, after this chapter, you will be confident enough to design any layout by yourself.

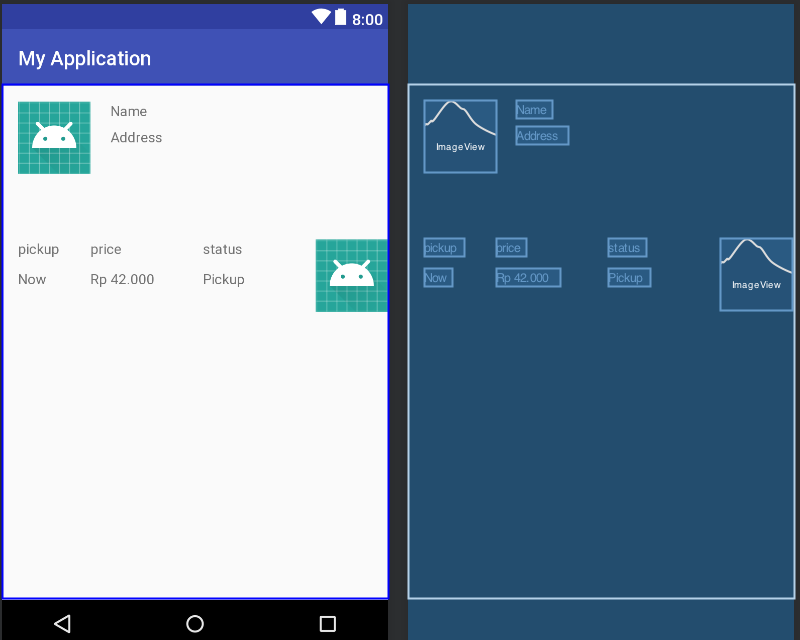
We are going to design the above sample. :)
Let’s simplify the design first. We can see we have two image and eight different texts in that image. That means we need to have eight TextViews and two ImageViews inside. We will do that first..
You can see we have added the views inside the layout. Now we need to attach each of the views to the exact place in order to see it functional. We will start with the Image first.

XML code of the generated Design
Please have a look at the xml code as well. You can switch the tab from Design to Text at the Bottom-Left corner of the above screen.
Profile Image : The Top-Left corner image. We need to give proper space inside the entire layout. So we are going to set the margin around the image and attach the constraint next.

Hover on the image first. You will see the 4 circles around the view. Each of the views are required to connect to the Top, Left, Right and Bottom of the screen. In the “Attributes” section, we can see the view is given random margin everywhere. Considering our requirement, we can set 32dp at Top and Left of the Profile Image and connect the Bottom and Right with the Parent.
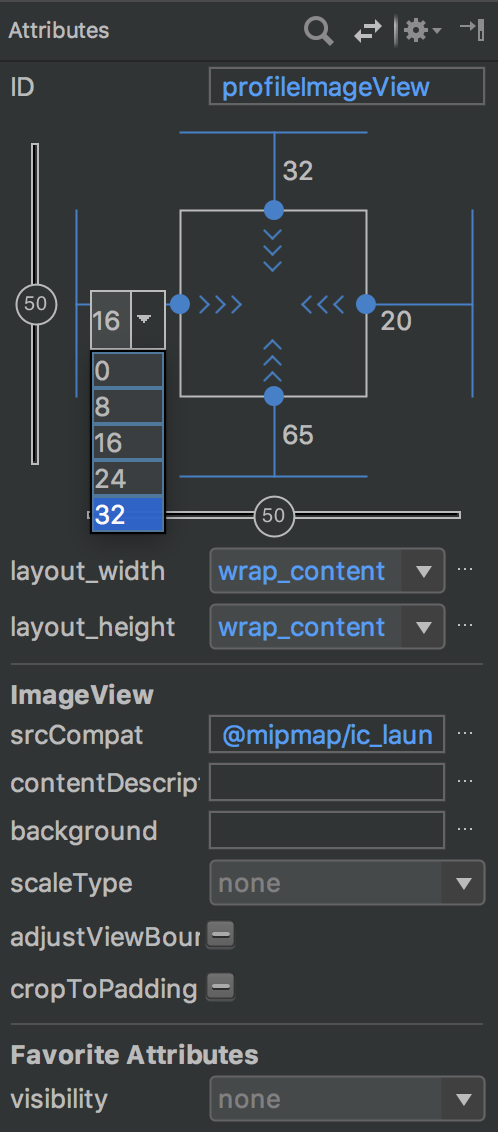
Change the dropdown from “Attributes” section to give margin
There are 3 different sizes we can give to each view. wrap_content, Fixed(Custom Size) and match_constraint in a Constraint Layout. Depending on the requirement, we need to set accordingly. You need to play with these 3 more to understand more.
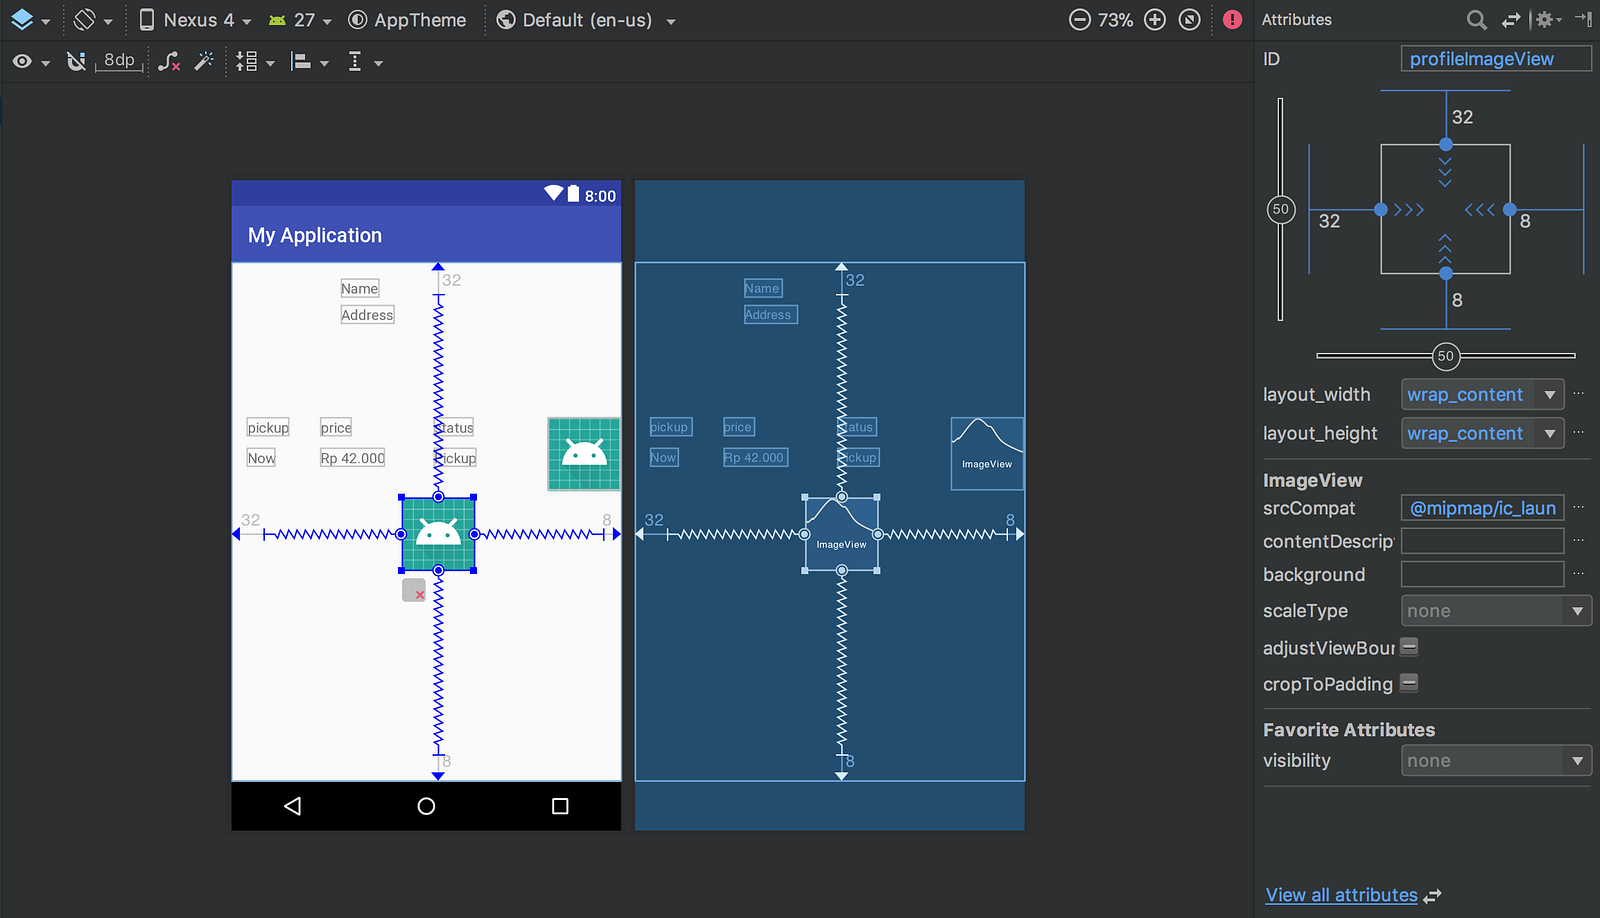
Added the constraints on all four directions
Once you add the remaining constraints, you will notice the margins we gave to Top and Left. Also, you can see the Right and Bottom have got some default margins 8dp which we can again change from the dropdown of “Attributes” section. Now, our image have come to the centre of the screen which we need to change.
Did you notice, we have one Vertical and Horizontal aligning tool available here at Attributes section? These are known as layout_constraintHorizontal_bias & layout_constraintVertical_bias. This will appear when you set the all four dots/constraints connected to top, left, right and bottom. Then you can set the positioning of the view. Default is set at 50–50 on Horizontally and Vertically. Now we are going to set both at 0–0 so that we can see our profile image at exact place.

The basic setup is done for the first image. Now we are going to focus on the Name and Address. Point to be noted, you can try designing any of the way you find out convenient for you. I have decided to set Address design first and Name next. Again, it is up to you to decide.

We need to hover on the TextView to get the 4 circles again and we need to connect to the accurate place. Look at the “Attributes” segment again. The addressTextView size is set to “wrap_content” and set the margin around 8 dp on each side. The addressTextView is connected on the right of the profileImageView by setting layout_constraintStart_toEndOf to the addressTextView. Hopefully you now understand how to set one view to the Right of another view.

We have set the Horizontal & Vertical Bias to the addressTextView and stretched to Right of the Parent Layout.

Then we are focusing on the nameTextView. My intention is to make nameTextView on Top of the addressTextView which is why, I have set the addressTextView first. Unlike addressTextView, there is one more extra field added to the nameTextView, which is ConstraintTop_toTopOf. I believe, you feel the need to implement this feature because nameTextView must be aligned with the Top of profileImageView. Also, we have set nameTextView Bottom on the Top of addressTextView by setting ConstraintBottom_toTopOfto nameTextView.

We have set the match_constraint to each of the TextViews; nameTextView & addressTextView which helps us to expand the width of the view.
Furthermore, we are going to add one bottom container with greyish background where the bottom views will be placed.

Later on, we need to add the bottom textViews with the productImageView to this View. We will start with pickUpTextView.

The Left, Right and Top constraints of the pickUpTextView are added to the Left, Right and Top of the bottomContainerView which will be followed by the timeTextView. The Bottom of the pickUpTextView has been added on Top of the timeTextView whereas the Left, Right and Bottom of the timeTextView has been set on the Left, Right and Bottom of the bottomContainerView. The Top of the timeTextView has been added to the Bottom of the pickUpTextView.
The next two views are priceTextView and priceValueTextView. I will use a trick which actually will align the priceTextView with pickUpTextView and priceValueTextView with timeTextView. The trick is Baseline. You need to click on any view, you will see the baseline which you need to connect with the baseline of another view. The views will be aligned and moving the parent view will cause the child views to move accordingly as well.

Baseline
Following that, I will be continuing implementing the statusTextView and deliveryTextView with baseline.

The baseline explained more
The statusTextView and deliveryTextViews are aligned. Refer to the image attached below.

The last but not the least, the productImageView has been added to the bottomContainer.

Finally, we have aligned all the views as per the requirement. Now the last remaining thing is to give each of the views proper margin and assign the values inside the views. Let’s proceed with assigning values first.
I have added strings.xml, colors.xml and two images in drawable folder. After that, the layout looks like this..

In the part of this series (Part 3) I will discuss about the Guideline & Barrier of Constraint Layout. Meanwhile, you can find the code in my Github profile added below.
NsAveek/ConstraintLayout
ConstraintLayout - Different way of implementing the same layout